Why Mochi Ice Cream Is Your New Favorite Treat
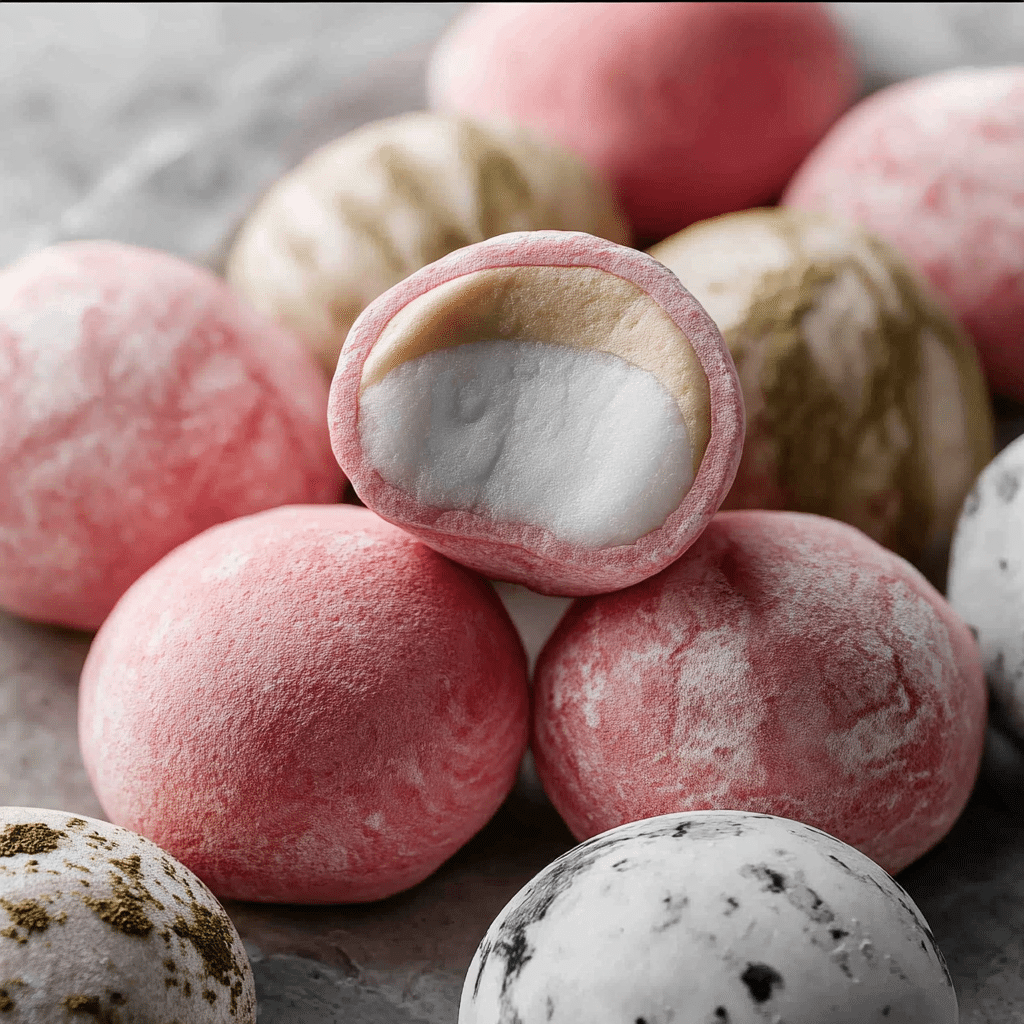
Discover the chewy delight of Mochi Ice Cream, a sweet, creamy treat that perfectly combines soft mochi dough with luscious ice cream inside. This delightful dessert is a fantastic way to satisfy your cravings anytime, blending texture and flavor into every bite. If you’re searching for a unique dessert experience that’s both fun and delicious, Mochi Ice Cream is about to become your new favorite treat.
Why You’ll Love This Recipe
- Irresistible Texture: The chewy mochi exterior pairs perfectly with smooth, creamy ice cream, creating a satisfying contrast.
- Endless Flavors: From classic vanilla to exotic mango or green tea, Mochi Ice Cream can cater to all taste preferences.
- Perfect Portions: Bite-sized and easy to share, making it great for parties, snacks, or a personal indulgence.
- Fun to Make: Creating mochis at home is surprisingly simple and a fun kitchen project that’s rewarding and creative.
- Gluten-Free Treat: Since mochi rice flour is gluten-free, this dessert is naturally suitable for gluten-sensitive individuals.
Ingredients You’ll Need
The magic of Mochi Ice Cream lies in its simple but essential ingredients. Each component plays a crucial role: the rice flour gives the signature chewiness to the mochi, sugar adds just the right sweetness, and the ice cream filling brings creamy richness and variety of flavors.
- Sweet Rice Flour (Mochiko): The key to achieving the soft, chewy texture unique to mochi dough.
- Sugar: Adds sweetness to balance the mild flavor of the rice flour.
- Water: Moistens the dough so it becomes pliable and easy to shape.
- Cornstarch or Potato Starch: Prevents the sticky mochi from clinging to surfaces and hands during handling.
- Ice Cream: Choose your favorite flavors; from traditional vanilla or matcha to adventurous fruit varieties.
Variations for Mochi Ice Cream
Mochi Ice Cream is wonderfully versatile. You can easily swap out fillings, alter the color of the mochi skin, or tweak sweetness levels based on your taste or dietary needs. Here are some favorite ways to customize this treat at home.
- Fruit-Flavored Mochi: Add fruit purees or food coloring to the dough for a flavorful, colorful twist.
- Dairy-Free Fillings: Use coconut milk or almond milk-based ice cream to keep it vegan-friendly.
- Chocolate Lovers: Fill with chocolate ice cream or dip the finished mochi in melted chocolate for extra richness.
- Green Tea Matcha Mochi: Mix matcha powder into the dough or choose matcha ice cream filling for authentic Japanese flair.
- Nutty Touch: Add crushed nuts or nut butter inside for a crunchy surprise.

How to Make Mochi Ice Cream
Step 1: Prepare the Ice Cream Filling
Begin by scooping your favorite ice cream into small, bite-sized balls using a melon baller or spoon. Place these balls on a parchment-lined tray and freeze them until solid, at least 2 hours. This ensures they hold their shape during assembly.
Step 2: Make the Mochi Dough
In a microwave-safe bowl, mix sweet rice flour, sugar, and water until smooth. Microwave the mixture in short bursts, stirring between intervals to develop a sticky, stretchy dough. The key is to achieve a soft, translucent mochi that’s pliable but not runny.
Step 3: Shape the Mochi Wrappers
Dust a clean surface with cornstarch and transfer the mochi dough onto it. Roll out the dough to about 1/4 inch thickness and cut into circles using a cookie cutter or glass. Keep the surface well-dusted to prevent sticking.
Step 4: Assemble the Mochi Ice Cream
Remove ice cream balls from the freezer. Quickly place one ball in the center of each mochi circle. Gently pinch the edges of the mochi together to seal the ice cream inside, making sure there are no gaps. Work swiftly to prevent ice cream from melting.
Step 5: Freeze to Set
Place the sealed mochi ice cream balls back on the tray, seam side down, and freeze for at least 2 more hours to firm up before serving.
Pro Tips for Making Mochi Ice Cream
- Keep it Cool: Make sure your hands and work surfaces are dusted and cool to handle the mochi easily.
- Use Starch Liberally: Generously use cornstarch or potato starch to prevent sticking and tearing of mochi dough.
- Work Quickly: The ice cream needs to stay frozen; assemble fast to avoid melting.
- Microwave in Intervals: Heat the dough gradually and stir well to get the perfect sticky texture without overcooking.
- Experiment with Flavors: Don’t be afraid to try different ice cream and mochi flavor combos to discover your personal favorite.
How to Serve Mochi Ice Cream
Garnishes
Enhance your Mochi Ice Cream presentation with a dusting of matcha powder, a sprinkle of toasted coconut flakes, or a drizzle of melted chocolate for added flavor and visual appeal.
Side Dishes
Serve Mochi Ice Cream alongside fresh fruit slices like strawberries or mango, or pair with crispy rice crackers for a delightful contrast in textures.
Creative Ways to Present
Arrange mochis in colorful patterns on a platter, serve them on skewers as bite-sized kebabs, or stack them in a playful pyramid for an inviting dessert centerpiece.
Make Ahead and Storage
Storing Leftovers
Store leftover Mochi Ice Cream in an airtight container in the freezer to maintain freshness and prevent freezer burn. Avoid stacking directly on each other to keep their shape intact.
Freezing
For best results, freeze the assembled Mochi Ice Cream for at least 2 hours before eating or packaging. This keeps the mochi tender but firm around a frozen center.
Reheating
Mochi Ice Cream is meant to be enjoyed cold, so avoid reheating. If softening is needed, let sit at room temperature for a few minutes but avoid melting the ice cream inside.
FAQs
What is Mochi Ice Cream made of?
Mochi Ice Cream consists of a chewy mochi dough made from sweet rice flour wrapped around a ball of ice cream, creating a delicious cold dessert with a soft outer layer.
Is Mochi Ice Cream gluten-free?
Yes! Since it’s made from sweet rice flour which is naturally gluten-free, Mochi Ice Cream is safe for those with gluten sensitivities or celiac disease.
Can I use any ice cream flavor for this recipe?
Absolutely! You can use any flavor of ice cream you love, from classic choices like vanilla and chocolate to unique options like matcha or mango.
How long does Mochi Ice Cream last in the freezer?
When stored properly in an airtight container, Mochi Ice Cream can last up to two weeks in the freezer without losing quality.
Can I make Mochi Ice Cream ahead of time?
Yes, Mochi Ice Cream can be prepared ahead and stored frozen until ready to serve, making it a convenient and make-ahead dessert option.
Final Thoughts
Mochi Ice Cream brings together the best of chewy texture and creamy sweetness in a fun, bite-sized package that’s sure to brighten your day. Whether you’re new to this delightful treat or looking to create it at home, this recipe promises a rewarding experience and a delicious reward. Give it a try—you just might find your new favorite dessert!
Related Posts
- Irresistible Strawberry Shortcake Cheesecake Rolls Recipe
- Irresistible Chocolate Peanut Butter Dream Bars Recipe
- How to Make Irresistible Dr. Pepper Brownies
Mochi Ice Cream

Mochi Ice Cream is a delightful gluten-free dessert featuring soft, chewy mochi dough wrapped around creamy ice cream balls. This fun and easy-to-make sweet treat offers a perfect balance of texture and flavors, customizable with endless ice cream flavors and variations to delight any palate.
- Prep Time: 30 minutes
- Cook Time: 5 minutes
- Total Time: 4 hours 35 minutes
- Yield: 12 mochi ice cream pieces 1x
- Category: Appetizers
- Method: Microwaving
- Cuisine: Japanese
- Diet: Gluten Free
Ingredients
Mochi Dough
- 1 cup Sweet Rice Flour (Mochiko)
- 1/4 cup Sugar
- 3/4 cup Water
- Cornstarch or Potato Starch (for dusting)
Ice Cream Filling
- Ice Cream of your choice (various flavors such as vanilla, matcha, mango, chocolate, or dairy-free alternatives)
Instructions
- Prepare the Ice Cream Filling: Scoop your favorite ice cream into small, bite-sized balls using a melon baller or spoon. Place the ice cream balls on a parchment-lined tray and freeze them until solid, at least 2 hours, to ensure they hold their shape during assembly.
- Make the Mochi Dough: In a microwave-safe bowl, whisk together sweet rice flour, sugar, and water until smooth. Microwave the mixture in short bursts (about 1 minute at a time), stirring in between to develop a sticky, stretchy dough that is soft, translucent, and pliable but not runny.
- Shape the Mochi Wrappers: Generously dust a clean surface with cornstarch or potato starch. Transfer the mochi dough onto the surface and roll it out to about 1/4 inch thickness. Use a cookie cutter or a glass to cut the dough into circles, keeping the surface well-dusted to prevent sticking.
- Assemble the Mochi Ice Cream: Remove the ice cream balls from the freezer. Quickly place one ice cream ball in the center of each mochi circle. Gently pinch the edges together to completely seal the ice cream inside, making sure no gaps remain. Work swiftly to prevent the ice cream from melting.
- Freeze to Set: Place the sealed mochi ice cream balls seam side down on a tray and freeze for at least 2 more hours until firm before serving.
Notes
- Keep your hands and working surfaces cool and well-dusted with starch to handle the mochi dough easily.
- Use cornstarch or potato starch liberally to prevent sticking and tearing of the dough.
- Assemble quickly to avoid ice cream melting.
- Microwave dough gradually, stirring well to get the perfect sticky texture without overcooking.
- Feel free to experiment with various ice cream flavors and mochi dough colorings or add-ins to create unique variations.
Nutrition
- Serving Size: 1 piece
- Calories: 100-130
- Sugar: 8g
- Sodium: 15mg
- Fat: 5g
- Saturated Fat: 3g
- Unsaturated Fat: 1g
- Trans Fat: 0g
- Carbohydrates: 15g
- Fiber: 0.5g
- Protein: 1g
- Cholesterol: 20mg
Keywords: Mochi Ice Cream, Gluten Free Dessert, Japanese Dessert, Ice Cream Recipes, Sweet Rice Flour Dessert