How to Make Mini Chocolate Tarts Fast
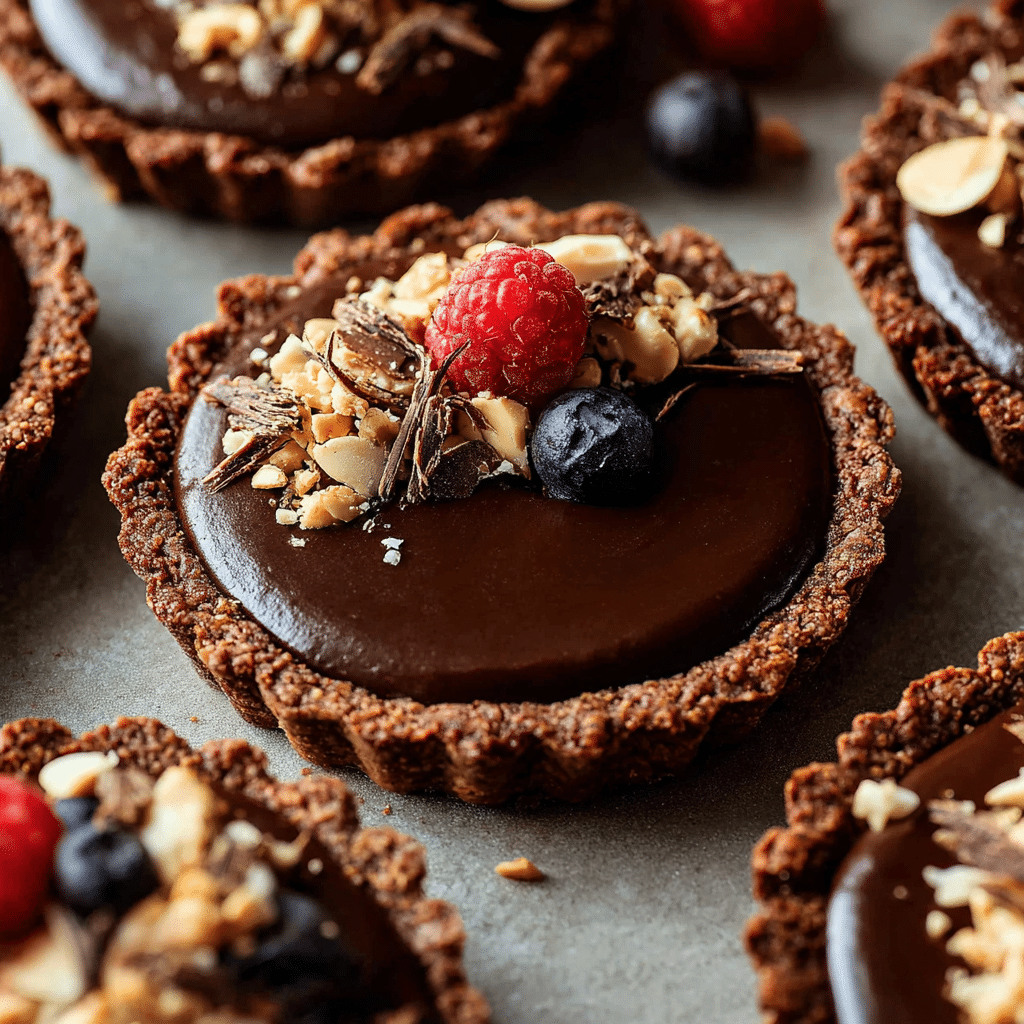
If you’ve ever dreamed of whipping up a delightful dessert in a flash, then this recipe for Mini Chocolate Tarts is going to become your new best friend. These little gems pack an intense chocolate punch inside a buttery crust, perfect for any sweet craving or special occasion. Whether you’re hosting a party, surprising loved ones, or just treating yourself, this quick and foolproof recipe will have you creating irresistible delights with ease in no time.
Why You’ll Love This Recipe
- Super quick preparation: From start to finish, these Mini Chocolate Tarts come together lightning fast, perfect for last-minute dessert needs.
- Rich flavor explosion: Despite their size, each tart delivers a rich, velvety chocolate taste that satisfies any chocolate lover’s dream.
- Easy to customize: You can tweak flavors, toppings, or crusts to suit your taste or dietary preferences effortlessly.
- Perfect portion size: These individual tarts make sharing simple and reduce waste, ideal for gatherings or solo indulgence.
- Minimal ingredients: With just a few staple pantry items, you can create a fancy dessert that’ll wow everyone.
Ingredients You’ll Need
This recipe keeps things wonderfully simple with a handful of essential ingredients, each carefully chosen to create the perfect balance of taste, texture, and appearance in every Mini Chocolate Tart.
- Butter: Adds rich flavor and helps create the flaky, tender tart crust that holds everything together.
- All-purpose flour: Provides structure and the ideal crumbly texture for the tart shells.
- Sugar: Sweetens the crust and the chocolate filling for just the right balance of chocolatey goodness.
- Dark chocolate: Use high-quality dark chocolate for a deep, intense chocolate flavor in the filling.
- Heavy cream: Brings creaminess and smoothness to the chocolate filling, making it luscious and decadent.
- Vanilla extract: Enhances the chocolate flavor with subtle warmth and aroma.
- Eggs: Help set the filling to a silky texture that holds perfectly inside the crust.
- Salt: Just a pinch to brighten all the flavors and balance the sweetness.
Variations for Mini Chocolate Tarts
Feel free to get creative with this recipe! Mini Chocolate Tarts are versatile, and it’s easy to adapt each element based on what you have on hand, your dietary needs, or simply to experiment with new flavors.
- Nutty twist: Add chopped toasted nuts like hazelnuts or almonds on top for crunch and added flavor.
- Fruit infusion: Mix in fresh raspberries or orange zest in the filling for a bright, fruity note.
- Gluten-free option: Use almond flour or a gluten-free flour blend for the crust to accommodate gluten sensitivities.
- Vegan adaptation: Substitute butter with coconut oil and use a non-dairy cream and dairy-free chocolate for a plant-based version.
- Spiced chocolate: Sprinkle cinnamon or a pinch of chili powder into the filling for an unexpected kick.

How to Make Mini Chocolate Tarts
Step 1: Prepare the Tart Crust
Start by mixing the softened butter with sugar until creamy and smooth. Gradually add the flour and a pinch of salt, combining quickly until the dough just comes together. Press the dough evenly into your mini tart pans or muffin tin molds, creating a nice even base and slightly pressing up the sides. Chill the crusts in the fridge for about 15 minutes to firm up before baking.
Step 2: Blind Bake the Tart Shells
Preheat your oven to 350°F (175°C). Line each crust with parchment paper and fill with pie weights or dried beans to prevent puffing. Bake the shells for 12-15 minutes until the edges turn golden brown. Remove the weights and parchment, then bake for another 5 minutes until the bottoms are cooked through and crisp. Let cool completely before filling.
Step 3: Prepare the Chocolate Filling
While the crusts bake, combine chopped dark chocolate and heavy cream in a heatproof bowl. Warm gently over a double boiler or microwave in short intervals, stirring constantly, until melted and smooth. Stir in vanilla, then beat in eggs one at a time until well incorporated. The mixture should be glossy and thick – perfect for pouring.
Step 4: Fill and Bake
Pour the chocolate filling evenly into the cooled tart shells. Place back in the oven for 12-15 minutes on 325°F (160°C), just enough for the filling to set but still remain soft and fudgy in the center. Avoid overbaking to keep the perfect creamy texture.
Step 5: Cool and Serve
Remove the tarts from the oven and allow them to cool at room temperature. Once cooled, transfer to the refrigerator for at least 30 minutes to fully set. This chilling step is key for slicing and serving neat, beautifully set Mini Chocolate Tarts.
Pro Tips for Making Mini Chocolate Tarts
- Chill your dough: Refrigerate the crust dough before baking to prevent shrinking and promote flakiness.
- Use good chocolate: High-quality chocolate makes a noticeable difference in the richness and flavor of the filling.
- Avoid overbaking: Underbake slightly to preserve that creamy, ganache-like texture inside the tarts.
- Work quickly with the filling: Pour the warm chocolate filling into the crust promptly to ensure smooth, even setting.
- Serve at the right temperature: Chill tarts before serving for clean slices and perfect texture contrast.
How to Serve Mini Chocolate Tarts
Garnishes
Top your Mini Chocolate Tarts with a dollop of whipped cream, fresh berries like raspberries or strawberries, a sprinkle of powdered sugar, or even edible gold flakes for a stunning finish every time.
Side Dishes
Pair these tarts with a side of vanilla bean ice cream, a drizzle of raspberry coulis, or a cup of freshly brewed coffee or espresso to complement the deep chocolate flavors beautifully.
Creative Ways to Present
Arrange several Mini Chocolate Tarts on a decorative platter with colorful edible flowers, or serve each tart individually on small plates drizzled with caramel or berry sauce to impress guests at your next gathering.
Make Ahead and Storage
Storing Leftovers
Store leftover Mini Chocolate Tarts in an airtight container in the refrigerator for up to 3 days. This keeps them fresh and maintains the texture of the crust and filling.
Freezing
You can freeze unfrosted tarts by wrapping each one individually in plastic wrap and placing them in a freezer-safe bag for up to a month. Thaw in the refrigerator overnight before serving.
Reheating
To enjoy warm tarts, let them come to room temperature first, then gently warm in a low oven (300°F / 150°C) for 5-7 minutes, taking care not to melt the filling too much.
FAQs
Can I use milk chocolate instead of dark chocolate?
Absolutely! You can substitute milk chocolate for dark chocolate, but keep in mind this will make the filling sweeter and less intense in flavor.
How do I prevent the tart crust from becoming soggy?
Blind baking the crust thoroughly before adding the filling is crucial to keep it crisp and avoid sogginess in your Mini Chocolate Tarts.
Can I make these tarts gluten-free?
Yes, using almond flour or a gluten-free baking blend will work well for the crust, making the recipe gluten-free without sacrificing taste.
How long do Mini Chocolate Tarts keep in the refrigerator?
Refrigerated Mini Chocolate Tarts are best consumed within 3 days for optimal flavor and texture.
What’s the best way to transport Mini Chocolate Tarts for a party?
Place them in a rigid container with compartments or on a flat tray, keeping them chilled until transport to prevent melting or damage.
Final Thoughts
Making Mini Chocolate Tarts fast doesn’t mean compromising on flavor or fun. This recipe combines simplicity, speed, and indulgence in every bite. Give it a try and see how quickly these charming little treats can bring a big smile to your face and delight everyone you share them with!
Related Posts
- Why Homemade Peach Ice Cream Tastes Best
- Why Baby Lemon Impossible Pies Are Irresistible Treats
- How to Make Raspberry Lemon Tart Bars Easily
Mini Chocolate Tarts

Mini Chocolate Tarts are quick-to-make, rich, and indulgent desserts featuring a buttery, flaky crust filled with a luscious dark chocolate ganache. Perfect for last-minute treats, gatherings, or special occasions, these tarts offer a perfect portion size with deep chocolate flavor and easy customization options.
- Prep Time: 20 mins
- Cook Time: 30 mins
- Total Time: 50 mins
- Yield: 12 mini tarts 1x
- Category: Dessert
- Method: Baking
- Cuisine: American
- Diet: Gluten Free
Ingredients
For the Tart Crust
- 1/2 cup (113g) unsalted butter, softened
- 1/4 cup (50g) sugar
- 1 cup (125g) all-purpose flour
- Pinch of salt
For the Chocolate Filling
- 6 oz (170g) high-quality dark chocolate, chopped
- 1/2 cup (120ml) heavy cream
- 1 tsp vanilla extract
- 2 large eggs
- Pinch of salt
Instructions
- Prepare the Tart Crust: Mix the softened butter with sugar until creamy and smooth. Gradually add the flour and a pinch of salt, combining quickly until the dough just comes together. Press the dough evenly into mini tart pans or muffin tin molds, creating an even base and slightly pressing up the sides. Chill the crusts in the fridge for about 15 minutes to firm up before baking.
- Blind Bake the Tart Shells: Preheat the oven to 350°F (175°C). Line each crust with parchment paper and fill with pie weights or dried beans to prevent puffing. Bake the shells for 12-15 minutes until edges turn golden brown. Remove weights and parchment, then bake another 5 minutes until the bottoms are crisp and cooked through. Let cool completely before filling.
- Prepare the Chocolate Filling: Combine chopped dark chocolate and heavy cream in a heatproof bowl. Warm gently over a double boiler or microwave in short intervals, stirring constantly until melted and smooth. Stir in vanilla extract, then beat in eggs one at a time until well incorporated. The mixture should be glossy and thick, perfect for pouring.
- Fill and Bake: Pour the chocolate filling evenly into the cooled tart shells. Bake at 325°F (160°C) for 12-15 minutes until the filling is set but still soft and fudgy in the center. Avoid overbaking to maintain a creamy texture.
- Cool and Serve: Remove from the oven and let cool at room temperature. Transfer to the refrigerator for at least 30 minutes to fully set before serving.
Notes
- Chill your dough before baking to prevent shrinking and promote flakiness.
- Use high-quality dark chocolate for best flavor.
- Avoid overbaking the filling to keep a creamy ganache-like center.
- Pour the warm filling quickly and evenly for smooth setting.
- Chill the tarts before serving for neat slices and ideal texture.
Nutrition
- Serving Size: 1 mini tart
- Calories: 180 kcal
- Sugar: 12 g
- Sodium: 55 mg
- Fat: 12 g
- Saturated Fat: 7 g
- Unsaturated Fat: 4 g
- Trans Fat: 0 g
- Carbohydrates: 18 g
- Fiber: 2 g
- Protein: 3 g
- Cholesterol: 60 mg
Keywords: chocolate tart, mini chocolate tart, quick dessert, chocolate dessert, baked chocolate tart, gluten-free chocolate tart