How to Make Homemade Vanilla Ice Cream Fast

If you’re craving something sweet, creamy, and utterly satisfying, this Homemade Vanilla Ice Cream recipe is your new best friend. Learn how to make creamy homemade vanilla ice cream quickly with this easy, fast recipe that brings classic dessert vibes straight to your kitchen without the fuss. With just a handful of simple ingredients and a few easy steps, you can whip up a delightful treat that tastes like it took hours but is ready in no time. Whether it’s for a sunny afternoon or a last-minute celebration, this recipe guarantees scoop-worthy happiness fast.
Why You’ll Love This Recipe
- Quick and Easy: Ready to enjoy in under an hour, perfect for spontaneous sweet cravings.
- Rich and Creamy: Uses simple ingredients that create a smooth, velvety texture.
- Customizable: A great base to add your favorite mix-ins or toppings.
- Cost-Effective: No need for expensive ice cream makers or rare ingredients.
- Kid-Friendly Fun: A simple way to engage the whole family in a sweet kitchen adventure.
Ingredients You’ll Need
Each ingredient here is straightforward but crucial—offering the perfect balance of sweetness, creaminess, and natural flavor that gives this Homemade Vanilla Ice Cream its signature taste and texture.
- Whole Milk: Provides the smooth base without heaviness, keeping the ice cream light yet rich.
- Heavy Cream: Adds luxurious creaminess and a silky mouthfeel crucial for ice cream texture.
- Granulated Sugar: Sweetens the ice cream beautifully without overpowering the vanilla.
- Vanilla Extract: The star ingredient, bringing a warm, fragrant depth to the ice cream.
- Salt: Just a pinch enhances all the flavors and balances the sweetness perfectly.
- Egg Yolks (optional): Used for a custard-style richness and smoother consistency—but you can skip for a quicker version.
Variations for Homemade Vanilla Ice Cream
Feel free to tailor this recipe to your taste buds or dietary needs—this Homemade Vanilla Ice Cream is incredibly forgiving and easy to adapt with just a few tweaks.
- Vegan Version: Substitute coconut milk and coconut cream for dairy, and use maple syrup instead of sugar.
- Chocolate Swirl: Add melted dark chocolate ribbons gently folded in before freezing for a rich surprise.
- Fruit-Infused: Mix in fresh berries or a swirl of homemade fruit preserves for a naturally sweet twist.
- Spiced Vanilla: Add cinnamon, nutmeg, or even cardamom to the milk mixture to infuse a warm spice aroma.
- Alcohol Boost: Stir in a splash of bourbon or rum for adult-friendly indulgence without losing creaminess.

How to Make Homemade Vanilla Ice Cream
Step 1: Prepare Your Ingredients
Start by measuring out whole milk, heavy cream, sugar, and vanilla extract. If using egg yolks for a custard base, prepare those separately. Having everything ready makes the process smooth and fast.
Step 2: Heat the Milk and Cream
In a medium saucepan, gently warm the milk and heavy cream over medium heat until it’s warm to touch but not boiling. This step helps dissolve the sugar and meld the flavors together perfectly.
Step 3: Whisk the Egg Yolks and Sugar
In a separate bowl, vigorously whisk egg yolks and sugar until pale and slightly thickened. This creates a custard base that contributes to the ultimate creamy texture in the ice cream.
Step 4: Temper the Egg Mixture
Slowly pour some warm milk into the egg mixture while whisking constantly to raise the temperature without scrambling the eggs. Then gradually combine everything back into the saucepan.
Step 5: Cook the Custard
Return the saucepan to low heat and stir continuously until the mixture thickens enough to coat the back of a spoon. This slow cooking step is essential for rich flavor and smooth texture.
Step 6: Add Vanilla and Chill
Remove the custard from heat, stir in vanilla extract and a pinch of salt, then transfer to a bowl and chill in the fridge for at least 30 minutes until completely cold.
Step 7: Freeze the Mixture
Pour the chilled custard into an ice cream maker and churn according to the manufacturer’s instructions, usually around 20-30 minutes. For a no-machine method, pour into a shallow container and freeze, stirring every 30 minutes.
Step 8: Set and Serve
For extra firmness, transfer the ice cream to an airtight container and freeze for an additional 1-2 hours. Then scoop, serve, and enjoy your homemade vanilla masterpiece.
Pro Tips for Making Homemade Vanilla Ice Cream
- Use High-Quality Vanilla: Pure vanilla extract or vanilla beans elevate the flavor dramatically.
- Don’t Skip the Chill: Fully chilling the base before churning results in creamier texture and faster freezing.
- Salt Boosts Flavor: A tiny pinch of salt enhances the sweetness and balances the taste.
- Slow and Low Heat: When cooking the custard base, keep the heat low to avoid curdling or burning.
- Experiment Gently: Add mix-ins in the last 5 minutes of churning to keep them evenly distributed.
How to Serve Homemade Vanilla Ice Cream
Garnishes
Top your Homemade Vanilla Ice Cream with fresh berries, a sprinkle of crushed nuts, chocolate chips, or a drizzle of caramel or honey for added texture and flavor contrast.
Side Dishes
Serve alongside warm fruit pies, freshly baked brownies, or crisp cookies to balance the cool creaminess with contrasting temperatures and textures.
Creative Ways to Present
Try serving in waffle cones or bowls, layer in parfait glasses with layers of fruit and granola, or sandwich between cookies for a fun ice cream sandwich treat.
Make Ahead and Storage
Storing Leftovers
Keep leftover Homemade Vanilla Ice Cream in an airtight container to prevent freezer burn and preserve freshness. For best taste, consume within one week.
Freezing
Freeze in a shallow, covered container to speed up freezing time and maintain smooth texture. Press a piece of parchment paper against the surface before sealing to minimize ice crystals.
Reheating
Ice cream is best enjoyed cold, but if it’s too hard to scoop, let it stand at room temperature for 5-10 minutes before serving to soften slightly.
FAQs
Can I make Homemade Vanilla Ice Cream without an ice cream maker?
Absolutely! You can freeze the mixture in a shallow dish and stir every 30 minutes until frozen to break up ice crystals for smooth texture.
How long does Homemade Vanilla Ice Cream last in the freezer?
Optimally, consume within one week for best texture and flavor, though it can last up to two weeks if stored properly.
Can I use different types of sugar in this recipe?
Yes, you can substitute granulated sugar with honey, maple syrup, or coconut sugar, but this may slightly alter the flavor and texture.
What’s the purpose of egg yolks in the recipe?
Egg yolks create a custard base that gives the ice cream a creamier, smoother texture and richer flavor.
How can I make this recipe vegan or dairy-free?
Replace dairy milk and cream with coconut milk or other plant-based milks and use natural sweeteners; adjust thickness by adding more fat like coconut cream.
Final Thoughts
There’s something incredibly satisfying about scooping a bowl of homemade vanilla ice cream that you made from scratch yourself. It’s creamy, silky, and so much better than store-bought versions, plus it’s ready faster than you might expect. Give this Homemade Vanilla Ice Cream recipe a try—you might just find yourself making it again and again for every occasion that calls for a sweet, refreshing treat.
Related Posts
- How to Make Strawberry Galette with Fresh Pie Crust
- Why Strawberry Crunch Cheesecake Cones Delight
- Irresistible Fresh Strawberry Cupcakes with Creamy Frosting
Homemade Vanilla Ice Cream
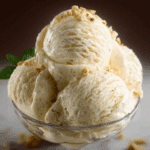
This Homemade Vanilla Ice Cream recipe delivers a quick, easy, and creamy dessert that brings classic vanilla flavor straight to your kitchen. Using simple ingredients like whole milk, heavy cream, sugar, and vanilla extract, you can make a smooth, velvety ice cream with minimal fuss. Optional egg yolks add custard richness, and several variations let you customize flavors to suit your preferences. Perfect for a spontaneous sweet treat or family fun, this recipe requires no expensive equipment and guarantees scoop-worthy happiness in under an hour.
- Prep Time: 15 minutes
- Cook Time: 20 minutes
- Total Time: 1 hour
- Yield: About 1 quart (4 servings) 1x
- Category: Dessert
- Method: Stovetop and Churning
- Cuisine: American
- Diet: Gluten Free
Ingredients
Base Ingredients
- 2 cups Whole Milk
- 2 cups Heavy Cream
- 3/4 cup Granulated Sugar
- 1 tablespoon Vanilla Extract
- Pinch of Salt
Optional Custard Base
- 4 Egg Yolks (optional)
Instructions
- Prepare Your Ingredients: Measure out whole milk, heavy cream, sugar, and vanilla extract. If using egg yolks for a custard base, separate and prepare them separately to streamline the process.
- Heat the Milk and Cream: In a medium saucepan, gently warm the whole milk and heavy cream over medium heat until it’s warm to the touch but not boiling. This helps dissolve the sugar and meld the flavors perfectly.
- Whisk the Egg Yolks and Sugar: In a separate bowl, vigorously whisk the egg yolks and sugar together until the mixture is pale and slightly thickened, creating a custard base for creamier texture.
- Temper the Egg Mixture: Slowly pour some of the warm milk mixture into the egg yolks while whisking constantly to raise the temperature without scrambling the eggs. Then, gradually combine everything back into the saucepan.
- Cook the Custard: Return the saucepan to low heat and stir continuously until the mixture thickens enough to coat the back of a spoon, ensuring rich flavor and smooth texture.
- Add Vanilla and Chill: Remove the custard from heat, stir in vanilla extract and a pinch of salt, then transfer to a bowl and chill in the refrigerator for at least 30 minutes until completely cold.
- Freeze the Mixture: Pour the chilled custard into an ice cream maker and churn according to the manufacturer’s instructions (generally 20-30 minutes). For a no-machine method, pour into a shallow container and freeze, stirring every 30 minutes to break up ice crystals.
- Set and Serve: For extra firmness, transfer the ice cream to an airtight container and freeze for an additional 1-2 hours. Scoop, serve, and enjoy your homemade vanilla ice cream masterpiece.
Notes
- Use High-Quality Vanilla: Use pure vanilla extract or vanilla beans to dramatically elevate flavor.
- Don’t Skip the Chill: Fully chilling the base before churning results in a creamier texture and faster freezing.
- Salt Boosts Flavor: A tiny pinch of salt enhances sweetness and balances taste.
- Slow and Low Heat: When cooking custard base, keep heat low to avoid curdling or burning.
- Experiment Gently: Add mix-ins in the last 5 minutes of churning to keep them evenly distributed.
Nutrition
- Serving Size: 1/2 cup
- Calories: 250
- Sugar: 20g
- Sodium: 50mg
- Fat: 18g
- Saturated Fat: 11g
- Unsaturated Fat: 6g
- Trans Fat: 0g
- Carbohydrates: 22g
- Fiber: 0g
- Protein: 3g
- Cholesterol: 85mg
Keywords: vanilla ice cream, homemade ice cream, easy dessert, creamy ice cream, custard ice cream, vanilla dessert