How to Perfect Chicken Kiev with Garlic Butter
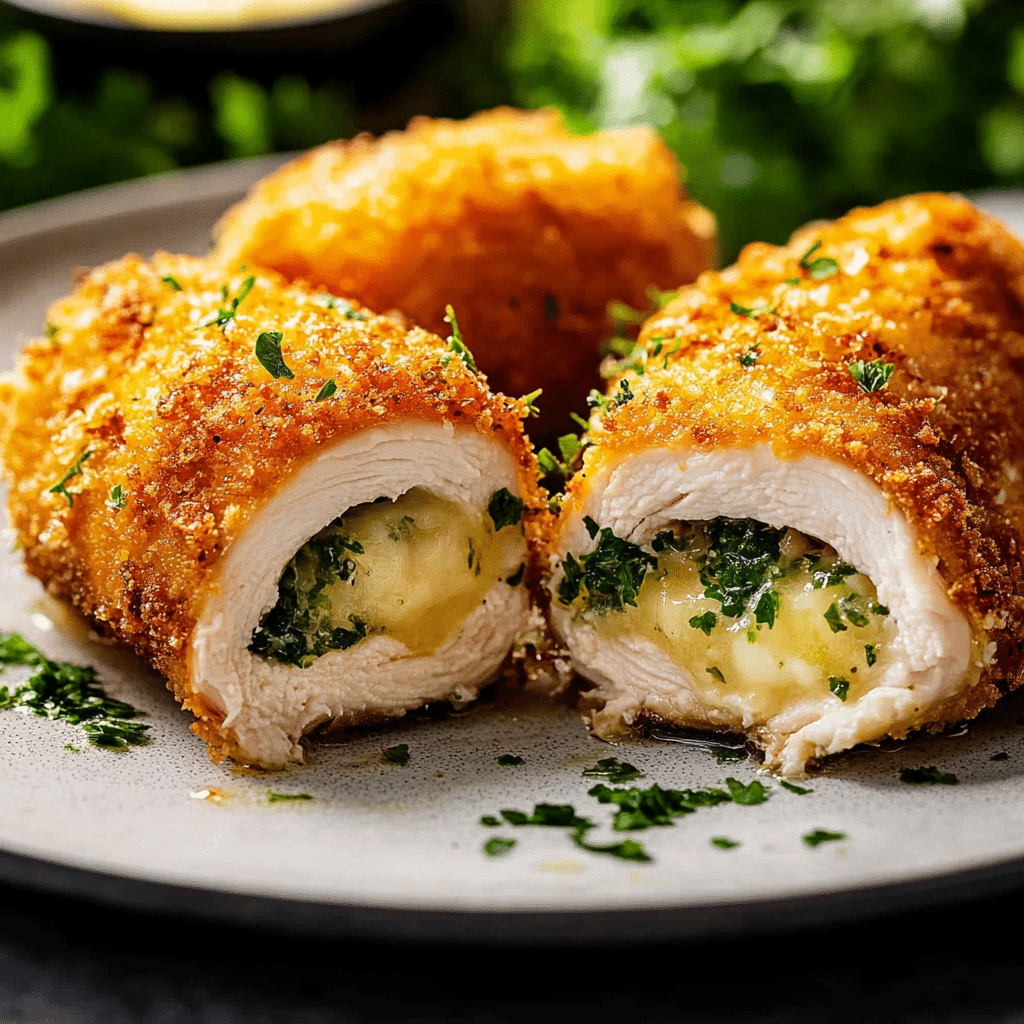
Discover the irresistible joy of Chicken Kiev with Garlic Butter, a classic dish that boasts crispy golden breading and a luscious, melting center bursting with rich garlic butter. This savory favorite combines simple, fresh ingredients to create a homemade delight that’s sure to impress at any dinner table. With easy-to-follow steps and tips, you’ll master a juicy, flavorful Chicken Kiev that melts beautifully in your mouth.
Why You’ll Love This Recipe
- Perfectly Crispy Exterior: Achieve a golden crust that adds satisfying crunch with every bite.
- Juicy Garlic Butter Core: Experience the rich, savory garlic butter that oozes from the center, making every mouthful melt in your mouth.
- Simple Ingredients: Uses everyday pantry staples that combine for extraordinary flavor without fuss.
- Impressive Yet Easy: A restaurant-quality dish you can confidently make at home without stress.
- Customizable to Taste: Easily adapted with herbs and spices to match your preferred flavors.
Ingredients You’ll Need
Each ingredient plays a key role in delivering the signature taste and texture of Chicken Kiev with Garlic Butter. From the fresh chicken breasts to the aromatic garlic butter, the combination is simple but essential for creating that irresistible flavor.
- Chicken Breasts: Skinless and boneless, thinly pounded to create a perfect pocket for the butter.
- Butter: Unsalted, softened to blend smoothly with garlic and herbs.
- Garlic: Freshly minced to infuse bold, aromatic flavor into the butter.
- Parsley: Finely chopped to add a bright, fresh note and lovely color to the garlic butter.
- Flour: Light coating ensures the egg wash and breadcrumbs stick perfectly.
- Eggs: Beaten to help the breadcrumbs adhere to the chicken for a crunchy finish.
- Bread Crumbs: Use fine or panko for extra crunch and golden color.
- Salt and Pepper: Basic seasoning to enhance natural flavors throughout.
- Vegetable Oil or Clarified Butter: For frying to crisp up the exterior without burning.
Variations for Chicken Kiev with Garlic Butter
Customizing this beloved recipe is a breeze. Whether you want to tone down the richness or add some exciting new flavors, these tweaks let your creativity shine without complicating the process.
- Herb-Infused Butter: Add fresh dill, tarragon, or thyme for a fragrant twist on the classic garlic butter.
- Spicy Kick: Mix in a pinch of chili flakes or smoked paprika into the butter for subtle heat.
- Cream Cheese Filling: Swap half the butter for cream cheese to create a luscious, tangy center.
- Gluten-Free Option: Use gluten-free breadcrumbs and flour alternatives to keep the crust crispy.
- Oven-Baked Version: Skip frying and bake the Kiev for a lighter, hands-off finish with nearly the same delicious taste.

How to Make Chicken Kiev with Garlic Butter
Step 1: Prepare the Garlic Butter
In a bowl, mix softened butter with freshly minced garlic, chopped parsley, salt, and pepper. Shape the mixture into tight logs using plastic wrap and chill in the freezer for about 30 minutes to firm up.
Step 2: Prepare the Chicken
Pound the chicken breasts between sheets of plastic wrap until they’re about ¼ inch thick. Carefully slice a pocket inside each breast without cutting through the edges.
Step 3: Stuff the Chicken
Place a firm piece of the chilled garlic butter inside each pocket, folding the sides over and securing with toothpicks if necessary to prevent the butter from leaking during cooking.
Step 4: Bread the Chicken
Set up three bowls for dredging: one with flour, one with beaten eggs, and one with breadcrumbs. Coat each stuffed chicken breast evenly in flour, dip in egg, then cover with breadcrumbs. For extra crispiness, repeat the egg and breadcrumb step.
Step 5: Fry the Chicken
Heat oil or clarified butter in a deep skillet over medium heat. Carefully fry the coated chicken breasts until golden brown on all sides, about 3-4 minutes per side. Reduce heat slightly if the crust browns too fast before the butter inside melts.
Step 6: Bake to Finish
Transfer the fried Chicken Kievs to a preheated oven (around 350°F or 175°C) and bake for 10-15 minutes to ensure the chicken cooks through and the butter softens perfectly inside.
Pro Tips for Making Chicken Kiev with Garlic Butter
- Chill the Butter: Freezing the garlic butter solid before stuffing prevents it from leaking during cooking.
- Gentle Pounding: Pound the chicken evenly for uniform thickness, which helps it cook evenly without tearing.
- Seal Well: Tuck the edges carefully and use toothpicks if needed to keep the garlic butter snug inside.
- Double Breading: For extra crunch, dip in egg and breadcrumbs twice for a thicker, crispier coating.
- Control the Heat: Fry over medium heat to avoid burning the breading while keeping the inside juicy.
How to Serve Chicken Kiev with Garlic Butter
Garnishes
A sprinkle of freshly chopped parsley or a wedge of lemon brightens the plate and complements the rich garlic butter inside the chicken.
Side Dishes
Pair your Chicken Kiev with creamy mashed potatoes, garlic sautéed green beans, or a simple mixed salad to balance the richness and add texture contrasts.
Creative Ways to Present
Slice the Chicken Kiev in half at the table to reveal the flowing garlic butter for a stunning presentation, or serve atop a bed of sautéed mushrooms for an elegant meal.
Make Ahead and Storage
Storing Leftovers
Keep any leftover Chicken Kievs in an airtight container in the refrigerator for up to 2 days to preserve freshness and flavor.
Freezing
For freezer-friendly prep, assemble and bread the Chicken Kievs, then freeze on a tray before transferring to a bag. Cook directly from frozen, adding extra baking time to ensure thorough cooking.
Reheating
Reheat leftovers gently in a low oven or air fryer to maintain crispiness while warming through, avoiding sogginess from microwave reheating.
FAQs
Can I use pre-made garlic butter for Chicken Kiev?
Yes, pre-made garlic butter can save time, but making your own ensures fresh flavors and the ability to customize herbs to your taste.
How do I prevent the butter from leaking out?
Freezing the garlic butter before stuffing and sealing the chicken pockets tightly helps keep the butter intact during cooking.
Is it necessary to fry and bake Chicken Kiev?
Frying creates the crispy crust, while baking ensures the chicken cooks evenly and the filling melts perfectly; skipping baking risks undercooked chicken.
What type of breadcrumbs works best?
Panko breadcrumbs give a lighter, crispier coating, but fine breadcrumbs also work well if you prefer a classic texture.
Can I make Chicken Kiev dairy-free?
You can substitute the butter with dairy-free margarine or a garlic oil blend; just keep in mind the flavor and texture may differ slightly.
Final Thoughts
Chicken Kiev with Garlic Butter brings a comforting yet elegant dish to your table that’s bursting with flavor and texture. This classic recipe is a rewarding project for both weeknight dinners and special occasions. Once you try it, you’ll find it hard to resist recreating this crispy, juicy delight that carries the magic of homemade cooking in every bite. So grab those ingredients and treat yourself to a memorable meal!
Related Posts
- Why Grilled Chicken & Broccoli Bowls with Creamy Garlic Sauce Delight
- Best Irish Pub Burgers to Savor Today
- How to Make Light Fluffy Sourdough Focaccia
Chicken Kiev with Garlic Butter

Chicken Kiev with Garlic Butter is a classic homemade dish featuring juicy, thinly pounded chicken breasts wrapped around a rich, savory garlic butter center. This recipe delivers a perfectly crispy golden crust with a luscious butter core that melts in your mouth, combining simple pantry staples for a restaurant-quality meal that’s easy to prepare and customizable to your taste.
- Prep Time: 40 minutes
- Cook Time: 25 minutes
- Total Time: 1 hour 5 minutes
- Yield: 4 servings 1x
- Category: Appetizers
- Method: Frying and Baking
- Cuisine: European
- Diet: Gluten Free (with substitutions)
Ingredients
Chicken and Butter Mixture
- 4 skinless, boneless chicken breasts, thinly pounded to about ¼ inch thickness
- ½ cup unsalted butter, softened
- 3 cloves garlic, freshly minced
- 2 tablespoons fresh parsley, finely chopped
- Salt, to taste
- Black pepper, to taste
Breading and Seasoning
- ½ cup all-purpose flour (or gluten-free flour alternative)
- 2 large eggs, beaten
- 1 cup breadcrumbs (fine or panko, use gluten-free if needed)
- Salt and pepper, for seasoning
For Cooking
- Vegetable oil or clarified butter, for frying
Instructions
- Prepare the Garlic Butter: In a bowl, combine the softened butter with freshly minced garlic, chopped parsley, salt, and pepper. Mix well until evenly blended. Shape the mixture into tight logs using plastic wrap and freeze for about 30 minutes until firm.
- Prepare the Chicken: Between two sheets of plastic wrap, pound each chicken breast evenly until about ¼ inch thick. Carefully cut a pocket inside each piece without cutting through the edges.
- Stuff the Chicken: Place a firm piece of the chilled garlic butter inside each chicken pocket. Fold the edges over to seal and secure with toothpicks if needed to prevent the butter from leaking during cooking.
- Bread the Chicken: Prepare three bowls: one with flour, one with beaten eggs, and one with breadcrumbs. Season the flour with salt and pepper. Dredge each stuffed chicken breast first in flour, then dip into egg, and finally coat evenly with breadcrumbs. For extra crispiness, repeat the egg and breadcrumb steps once more.
- Fry the Chicken: Heat vegetable oil or clarified butter in a deep skillet over medium heat. Carefully fry the breaded chicken breasts on all sides until a golden brown crust forms, about 3-4 minutes per side. Adjust heat as needed to prevent burning the crust while allowing the butter inside to melt.
- Bake to Finish: Transfer the fried Chicken Kievs onto a baking tray and bake in a preheated oven at 350°F (175°C) for 10-15 minutes to ensure the chicken is cooked through and the garlic butter inside softens perfectly.
Notes
- Chill the garlic butter logs solid in the freezer before stuffing to prevent leakage during cooking.
- Pound the chicken breasts evenly to ensure uniform cooking and prevent tearing.
- Seal the edges of the chicken pockets well and secure with toothpicks to keep the butter inside.
- Double breading by repeating the egg and breadcrumb steps gives a thicker, crispier coating.
- Fry over medium heat to avoid burning while allowing the inside butter to melt properly.
- For a gluten-free version, use gluten-free flour and breadcrumbs.
- You can bake the Chicken Kiev without frying for a lighter version, but frying helps achieve a crispier crust.
- Reheat leftovers gently in a low oven or air fryer to maintain crispness.
Nutrition
- Serving Size: 1 Chicken Kiev
- Calories: 450 kcal
- Sugar: 0.5 g
- Sodium: 350 mg
- Fat: 30 g
- Saturated Fat: 15 g
- Unsaturated Fat: 13 g
- Trans Fat: 0 g
- Carbohydrates: 18 g
- Fiber: 1 g
- Protein: 30 g
- Cholesterol: 120 mg
Keywords: Chicken Kiev, Garlic Butter Chicken, Crispy Chicken Recipe, Stuffed Chicken Breast, Classic Chicken Dish