Irresistible Cherry Crumble with Fresh Summer Cherries
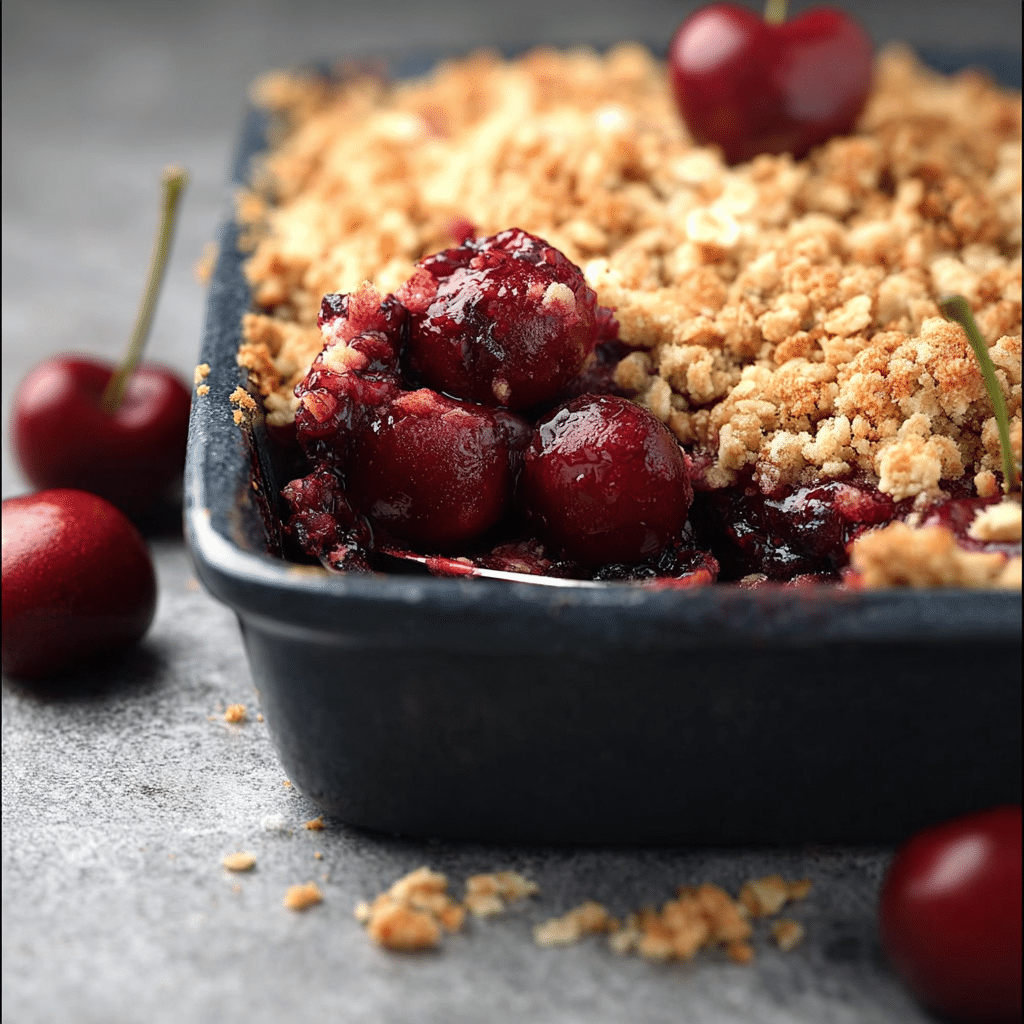
If you’re craving a dessert that perfectly captures the essence of summer, look no further than this mouthwatering Cherry Crumble with Fresh Summer Cherries. Bursting with juicy, tart cherries beneath a crispy, golden topping, this recipe balances sweetness and texture in every bite. It’s a classic, comforting treat that’s simple to make yet impressive enough to share with family and friends during those sunny warm days and cozy evenings alike.
Why You’ll Love This Recipe
- Summer freshness in every bite: The fresh summer cherries bring a vibrant, juicy tartness that awakens your taste buds.
- Perfectly balanced textures: A crispy crumble topping contrasts beautifully with the soft, bubbling cherry filling.
- Simple ingredients, amazing flavors: Only pantry staples and fresh cherries are needed to create a memorable dessert.
- Versatile and crowd-pleasing: It works well as an after-dinner dessert or an afternoon treat with tea or coffee.
- Easy to customize: You can tweak the crumble topping or add nuts and spices to suit your preference.
Ingredients You’ll Need
This Cherry Crumble with Fresh Summer Cherries recipe relies on simple, fresh, and complementary ingredients. Each one plays a critical role in building the flavor, texture, and eye-catching appeal of the dish.
- Fresh summer cherries: Choose ripe, pitted cherries for the juiciest, most flavorful filling.
- Granulated sugar: Sweetens the cherry filling, balancing the natural tartness perfectly.
- All-purpose flour: Used both in the filling to thicken and in the crumble topping to create that delightful crispiness.
- Brown sugar: Adds a subtle molasses richness to the crumble topping for depth of flavor.
- Cold unsalted butter: Key for that flaky, golden crumble texture when mixed into the topping.
- Rolled oats: Give a hearty, rustic crunch in the topping for added texture and nutrition.
- Ground cinnamon: Introduces a warm spice note that complements the cherries beautifully.
- Fresh lemon juice: Brightens the cherry filling, enhancing fruity flavors without overpowering.
- Vanilla extract: Infuses subtle sweetness and aroma to bring the entire dish together.
Variations for Cherry Crumble with Fresh Summer Cherries
One of the best things about this recipe is how easy it is to personalize based on your taste or pantry availability. Whether you want to make it gluten-free or add a twist, these variations make it fun and adaptable.
- Nutty upgrade: Add chopped almonds or walnuts to the crumble for crunchy texture and nuttiness.
- Gluten-free version: Swap all-purpose flour with gluten-free flour blends and ensure oats are gluten-free certified.
- Spiced delight: Mix in nutmeg or ground ginger with the cinnamon for a festive warming touch.
- Mixed berry crumble: Combine cherries with blueberries or raspberries to diversify the fruit flavors.
- Vegan option: Replace butter with coconut oil or vegan margarine for a dairy-free crumble.

How to Make Cherry Crumble with Fresh Summer Cherries
Step 1: Prepare the Cherry Filling
Start by pitting your fresh summer cherries and placing them in a large mixing bowl. Sprinkle with granulated sugar, a tablespoon of flour, fresh lemon juice, and vanilla extract. Toss well to coat the cherries evenly. This mixture thickens as it bakes, keeping the cherries juicy but not watery.
Step 2: Make the Crumble Topping
In a separate bowl, combine cold, cubed butter, brown sugar, flour, rolled oats, and cinnamon. Using your fingers or a pastry cutter, work the butter into the dry ingredients until the mixture resembles coarse crumbs. This step is key to achieving that golden, crunchy crumble crust.
Step 3: Assemble the Crumble
Transfer the cherry filling to a greased baking dish. Evenly spread the crumble topping over the cherries, gently pressing it down so it holds together but remains crumbly.
Step 4: Bake Until Golden and Bubbly
Bake in a preheated oven at 350°F (175°C) for about 35-40 minutes. The cherry filling should bubble around the edges, and the topping will be golden brown. Let it cool slightly to set before serving.
Pro Tips for Making Cherry Crumble with Fresh Summer Cherries
- Use ripe cherries: Fresh, ripe cherries ensure the best natural sweetness and juiciness.
- Keep butter cold: Using chilled butter in the crumble keeps the topping flaky instead of mushy.
- Don’t overmix crumble: A light hand when mixing creates the perfect crumbly texture.
- Let it rest before serving: Cooling for 10-15 minutes helps the filling thicken and flavors meld.
- Serve warm: Warm crumble enhances the juicy cherries and crispy topping experience.
How to Serve Cherry Crumble with Fresh Summer Cherries
Garnishes
Top with a scoop of creamy vanilla ice cream or a dollop of freshly whipped cream to contrast the warm crumble. A sprinkle of toasted nuts or a light dusting of powdered sugar adds a pretty finishing touch.
Side Dishes
This cherry crumble pairs wonderfully with a cup of herbal tea or freshly brewed coffee. For brunch, serve alongside a simple yogurt parfait or lightly sweetened ricotta cheese for added protein and creaminess.
Creative Ways to Present
Serve individual portions in ramekins or small mason jars for charming presentation, especially for gatherings. Layer the cherry crumble with Greek yogurt or custard for a trifle-inspired dessert that’s as visually stunning as it is delicious.
Make Ahead and Storage
Storing Leftovers
Store leftovers in an airtight container in the refrigerator for up to 3 days. The crumble topping may soften but reheating helps restore crispness.
Freezing
Cherry crumble freezes well either baked or unbaked. Wrap tightly and freeze for up to 3 months. Thaw overnight in the fridge before baking or reheating.
Reheating
Reheat leftovers in a preheated oven at 325°F (165°C) for 10-15 minutes until warmed through and crisp on top. Avoid microwaving to keep the topping crunchy.
FAQs
Can I use frozen cherries for this recipe?
Frozen cherries can be used but drain excess liquid before baking to prevent a soggy crumble. Adjust sugar slightly if using preserved cherries.
Is it necessary to add oats to the crumble topping?
Oats add a nice texture and rustic feel but can be omitted if you prefer a plain buttery crumble topping.
How do I pit cherries easily?
A cherry pitter is the easiest tool, but you can also use a small knife or a metal straw to push the pit out if you don’t have one.
Can this crumble be made vegan?
Yes, simply substitute butter with vegan butter or coconut oil to make this recipe fully vegan without sacrificing texture.
What’s the best way to serve this dessert?
This crumble is delightful warm, served with vanilla ice cream, whipped cream, or a drizzle of heavy cream for richness.
Final Thoughts
This Cherry Crumble with Fresh Summer Cherries is truly a summer classic that satisfies with juicy fruit and crispy topping in every spoonful. It’s simple enough to whip up on a weeknight yet special enough to impress guests. So grab those fresh cherries and start baking—this dessert is sure to become one of your absolute favorites!
Related Posts
- How to Make Creamy Rice Pudding Perfectly
- How to Make 6-Minute Perfect Caramel Fast
- Why Peach Blackberry Cobbler Is Perfect Dessert
Cherry Crumble with Fresh Summer Cherries
A classic and comforting Cherry Crumble that captures the essence of summer with juicy fresh cherries topped by a crispy, golden crumble. This easy-to-make dessert balances tartness and sweetness with delightful textures, perfect for sharing with family and friends during warm days or cozy evenings.
- Prep Time: 15 minutes
- Cook Time: 35-40 minutes
- Total Time: 50-55 minutes
- Yield: 6 servings 1x
- Category: Dessert
- Method: Baking
- Cuisine: American
- Diet: Can be gluten-free if gluten-free flour and oats are used
Ingredients
Cherry Filling
- 4 cups fresh summer cherries, pitted
- 1/2 cup granulated sugar
- 1 tablespoon all-purpose flour
- 1 tablespoon fresh lemon juice
- 1 teaspoon vanilla extract
Crumble Topping
- 1/2 cup cold unsalted butter, cubed
- 1/2 cup brown sugar, packed
- 3/4 cup all-purpose flour
- 3/4 cup rolled oats
- 1 teaspoon ground cinnamon
Instructions
- Prepare the Cherry Filling: Pit the fresh summer cherries and place them in a large mixing bowl. Sprinkle the cherries with granulated sugar, tablespoon of all-purpose flour, fresh lemon juice, and vanilla extract. Toss everything well to evenly coat the cherries. This mixture thickens as it bakes, keeping the cherries juicy but not watery.
- Make the Crumble Topping: In a separate bowl, combine cold cubed butter, brown sugar, flour, rolled oats, and cinnamon. Use your fingers or a pastry cutter to work the butter into the dry ingredients until the mixture resembles coarse crumbs. This step ensures a golden, crunchy crumble crust.
- Assemble the Crumble: Transfer the cherry filling to a greased baking dish. Evenly spread the crumble topping over the cherries, gently pressing it down so it holds together but remains crumbly.
- Bake Until Golden and Bubbly: Place the dish in a preheated oven at 350°F (175°C) and bake for 35-40 minutes. The cherry filling should bubble around the edges, and the crumble topping will be golden brown. Let it cool slightly for 10-15 minutes before serving to allow the filling to set.
Notes
- Use ripe cherries for best natural sweetness and juiciness.
- Keep the butter cold to maintain a flaky, crunchy crumble topping.
- Avoid overmixing the crumble topping to achieve perfect texture.
- Let the crumble rest before serving to allow flavors to meld and filling to thicken.
- Serve the crumble warm for the best taste experience.
Nutrition
- Serving Size: 1/6 of recipe
- Calories: 320 kcal
- Sugar: 28 g
- Sodium: 50 mg
- Fat: 15 g
- Saturated Fat: 9 g
- Unsaturated Fat: 5 g
- Trans Fat: 0 g
- Carbohydrates: 42 g
- Fiber: 4 g
- Protein: 3 g
- Cholesterol: 40 mg
Keywords: Cherry crumble, summer dessert, fruit crumble, fresh cherries, baking dessert, easy dessert, gluten-free dessert option